
PLC Sending E-mail function
PLC E-mail transmission function
PLC E-mail sending function introduces the function that can increase the usability of PLC by sending E-mail to the specific situation designated by the user. This message can be sent through the PLC E-mail transmission function when there is a problem with the system or when there is a need to inform the remote user.
System configuration
PLC Ethernet E-mail transmission service uses E-mail transmission protocol called Simple Mail Transfer Protocol (SMTP). SMTP deals with the rules for data transfer between an SMTP client responsible for sending mail and an SMTP server receiving mail.
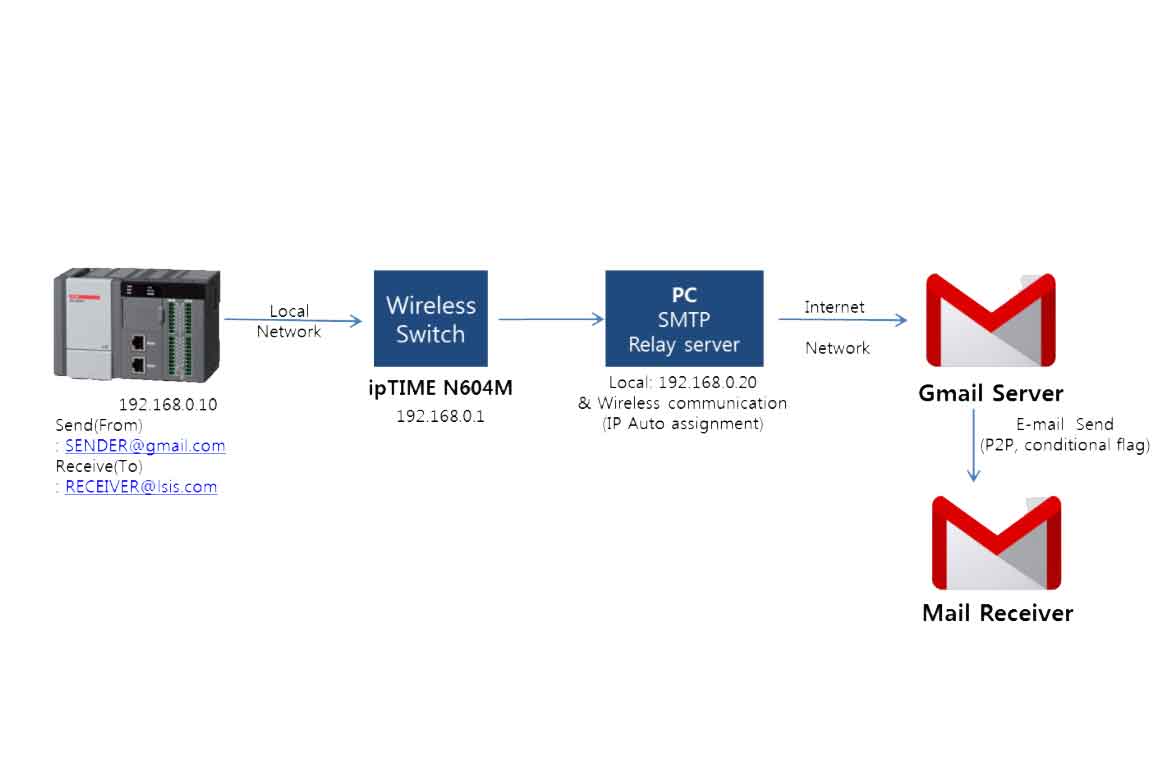
In the system to be configured in this document, built-in PLC block type Ethernet operates as an SMTP client, and the role of receiving real messages is using a gmail server. At this time, the user installs the SMTP Relay Server and sends the mail to the gmail server via this SMTP Relay Server. The system configuration for this example is shown below.

After connecting to the mail server using the mail server of the Gmail Server (SMTP Server) (sending side), the E-mail to be sent by the user is sent to the receiving side mail account Will be transmitted. At this time, PLC acts as mail receiver, but since it can not implement saving function for sending Gmail, it installs SMTP Relay server on PC and sends it to real mail receiving server through it. You also need to send mail through a hotspot to your PC because you need to send mail through the Internet. Now, I will explain the details of each setting step by step.
SMTP Relay Server Settings
You should download the SMTP Relay Server, which plays the role of sending E-mail on behalf of the PLC, from LSIS ‘website (www.lsis.co.kr). After downloading and installing the file, you need to set the firewall to perform the program normally. Control Panel – Click the “Allow programs or features through Windows Firewall” item to the left of windows firewall. Check ‘SMTPRelayServer’ in the Allowed Programs and Features section, check Domain, Home / Corporate (Private), Public and click the OK button. If ‘SMTPRelayServer’ does not appear at this time, click the ‘Allow other programs’ icon at the bottom to add it.
PC Network Settings
The network used on the PC side must set up the local network (Ethernet connection) to connect the PC’s SMTP Relay Server from the PLC and the wireless network (to connect to the Internet) to be used when sending the actual e-mail by connecting to the Gmail Server. First of all, in order to set up the local network, set up the local network as shown below. Select Internet Protocol Version 4 (TCP / IPv4) and enter the PC side IP address. Since it is necessary to communicate using the Ethernet network between the PC and the PLC, the IP address of the same band must be used. In this example, the local IP address of the PC is set to 192.168.0.20 and the IP address of the PLC is set to 192.168.0.10. We will also use the PC’s wireless network to connect to the Internet. Personal hotspot was connected and tested. At this time, Internet Protocol Version 4 (TCP / IPv4) is selected as the item “Obtain an IP address automatically”. After setting, run SMTP Relay Server on PC.

PLC setting
From now on, we will set the items for PLC E-mail setting in earnest.
- The PLC settings are divided into the following four stages as follows.
1. Ethernet basic setting
2. E-mail item setting
3. E-mail contents and E-mail recipient setting
4. P2P block setting
I will set it from Ethernet basic setting. The Ethernet default setting is for the window that comes out by double-clicking Ethernet in XG5000’s network configuration. In this window, set the IP address, Subnet mask, etc. of PLC Ethernet.

Next, right-click the communication module for E-mail, P2P setting and click ‘Add Item – P2P Communication’ to add P2P communication.

mail function and SMTP relay server function are used, check the corresponding items and enter the IP address and port number 25 of the PC running the program in the SMTP relay server information. Also, for the SMTP server, it should be the address of your Gmail server, so smtp.gmail.com, port number 465, and account name and password should contain the information you use to log in to Gmail. Since the address and port number of the SMTP server of the E-mail account used in this case are flexible,
| SMTP Server | SMTP Server Address | Port Number |
|---|---|---|
| smtp.gmail.com | 465 | |
| Yahoo | smtp.mail.yahoo.com | 456 |
| Naver | smtp.naver.com | 465 |
When you send mail using this SMTP account, you must additionally set security for your mail. If you use Gmail, your email will normally be sent when Gmail allows you to lower the security level of the apps and permissions that have access to that account.
The ‘event information’ yield in the email setting part is the part to set the e-mail when the status of the actual PLC is changed. If the corresponding part is not set, the mail will not be sent when the corresponding status of PLC is changed.
Next, you need to create the address and the contents of the mail to be sent to the SMTP server. When you send an e-mail from the PLC, you must add the e-mail you want to receive in the ‘Address’ window below. Since the item to be used when setting P2P block is ‘No’, it is convenient to remember the number.
You can also specify a group to receive mail, rather than just creating one recipient. It is also possible to set the group by clicking the ‘Group’ item in the address book below.

Next, in item # 1 of the email message list, the 10-byte device is read and the value (variable) of the device is transmitted. In the message editing window, only the device size to be read is specified. The maximum transmission byte is 80 bytes.

In the above example, you only have one entry for each message, but you can also write a message using a constant and variable as appropriate for a single message. When you have finished creating the e-mail address to send and the contents of the e-mail to be sent, you have to make a part about when to send it.
Next, create a P2P block as follows.

Since E-mail function is used, after checking the relevant part, set P2P function to ESEND and send the message. In the case of the next startup condition, this is the starting condition for when to transmit the created P2P block. In the above example, when the M00012 bit is 0-> 1, the index 0 message is transmitted. When the M00013 bit is 0-> 1, the index 1 message is transmitted. In addition, the actual message to be sent for each index is different. In particular, in case of index 1, the data stored in D00000 to 10 bytes is read and transmitted because the variable is used. If you change the status of bit M00012 and M00013, you can see that E-mail is sent.
First, when E-mail is sent by using M00012 device, the contents of the actual E-mail is as below. You can accept the contents of the actual string constant. M00013 When the status of the device is changed from 0 to 1, P2P index 1 is transmitted. Since the program is created as below and the message is transmitted by reading 10byte data from D00000, the following string is sent.

By the E-mail function in the PLC as above, a remote user can monitor the status of PLC by receiving it via E-mail.